General
A chip shortage still impacts the availability of the CM4. Our recommendation is to use rpilocator. This website tracks the stock of official Raspberry Pi distributors. Follow them on Twitter and enable push notifications. You will be notified as soon as the bot tweets that products are in stock.
We recommend purchasing a Raspberry Pi Compute Module 4 with the following characteristics:
- Min. 2 GB of RAM.
- Min. 16 GB of eMMC flash space.
- If you opt for the CM4 Lite: as it does not have an eMMC module, you must use an NVMe SSD hard drive. Some users reported that the following SSDs are not working on the Home Assistant Yellow.
Yellow has an M.2 M-Key connector which supports NVMe SSDs with M-Keying and length of 2230, 2242, 2260, or 2280.
- The Raspberry Pi CM4 has a single lane PCIe 2.0 (Gen 2.0 x1). PCIe is backwards compatible.
- NVMe SSDs supporting a newer generation of PCIe or more, supporting multiple lanes, should generally work (e.g. Samsung 970 EVO Plus MZ-V7S500BW with a PCIe Gen 3.0 x4 interface is known to work).
A high-end NVMe is not required, since the CM4 PCIe interface is only Gen 2.0 x1. A low-cost NVMe is typically good enough.
Check below to see a list of models which have been reported to NOT work currently:
All M.2 SATA SSDs are NOT supported. Besides the following NVMe SSDs are known to NOT work:
- WD_BLACK SN850X (1TB)
- WD_BLACK SN770
- WD_BLACK SN750 SE
- SK Hynix BC711
- Crucial P2 CT250P2SSD8
- Lexar NM620
- Samsung 980 Pro
- Samsung PM9B1 MZAL4256HBJD-00BL2 Rev 0
The Home Assistant Yellow team officially supports ZHA (Zigbee Home Automation), the Zigbee stack integrated into Home Assistant Core.
The Zigbee2MQTT project has experimental support (in beta stage) for the Silicon Labs radio on Home Assistant Yellow. With this setting Zigbee2MQTT is known to work on Home Assistant Yellow.
Note: The Zigbee Home Automation integration is active by default! If you are using Zigbee2MQTT, remember to delete and ignore the discovered Zigbee Home Automation integration to avoid interference.
Note: When setting up Zigbee2MQTT with the Home Assistant Yellow, you will need to configure the adapter type in Zigbee2MQTT. Make sure the following is present in your Zigbee2MQTT configuration:
serial:
    adapter: ezsp
    port: /dev/ttyAMA1
    baudrate: 115200
rtscts: trueThe Zigbee/Thread (IEEE 802.15.4) radio is directly connected via serial port to the Raspberry Pi Compute Module 4 on /dev/ttyAMA1. Note that there is no /dev/serial/by-id path for this serial port as its not connected through USB. The above tty path will remain static.
The Duracell CR2032 shipped with Home Assistant Yellow is estimated to last 10 years or more (with self-discharge taken into account). Replacement likely won't be necessary within the product's lifetime. If your RTC does not show the correct date, this is likely because the initial time synchronization failed. Make sure that your Internet router does not block NTP (Network Time Protocol) traffic.
In case you do replace the battery, make sure the positive side is facing upwards. You should see the plus sign.
The 3.5 mm barrel audio jack can be connected to an amplifier and used in combination with the VLC add-on. This exposes the output as a media player in Home Assistant Core.
Troubleshooting
- Try http://homeassistant:8123.
If that does not help, you may be able to find the IP address of Home
Assistant Yellow on your router. The URL will be
http://<IP ADDRESS>:8123 - Check if the Home Assistant Yellow is plugged in and the yellow LED blinks in a heartbeat pattern. For more information on the LED patterns, see Home Assistant Yellow LEDs.
- Check if the LED on the Ethernet port is green. If it is not green:
- Try using a different port on your router.
- Try using a different Ethernet cable.
- Check if the Raspberry Pi Compute Module 4 is seated correctly.
- For further debugging, perform the steps described in the procedure Using the serial console for debugging.
Note: The multiprotocol feature is still experimental.
OTBR and ZHA on separate channels can cause an unreliable network connection. To resolve this issue, you can try resetting the Thread network or use two separate wireless chips, one for ZHA and one for Thread. See About multiprotocol support - resolve channel conflict.
Note: The OpenThread Border Router add-on used to setup a Thread-only network on a wireless chip is still experimental.
The green Compute Module 4 (CM4) might not be seated correctly. Open the Yellow enclosure and check if the green CM4 PCB is parallel to the Yellow PCB.
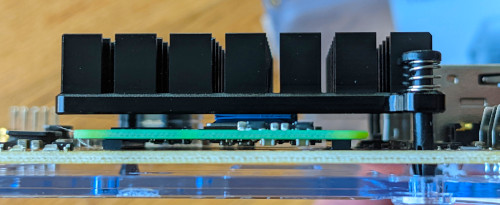
If this is not the case, check if the CM4 is well aligned with the white outline on the Yellow PCB. If the CM4 is not aligned, align it first before pressing onto the heat-sink. For that you will have to remove the heat-sink first. If the green PCB is aligned, press onto the heat-sink on the two marked spots (centered above the CPU/SoC) to snap the CM4 in place.

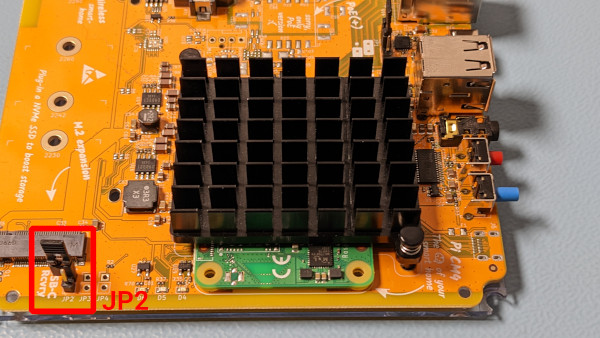
Note: The resolution described below only applies to revision 1.2 and older. Starting with revision 1.3, there is no JP2 jumper that could cause this issue.
Most likely your Compute Module 4 is in USB boot mode. Make sure that the jumper JP2 is not connected. This means the jumper is only touching one of the pins, not both.
Yes. To clear all user data as well as Home Assistant Core, Home Assistant Supervisor, and any installed add-ons from the system, perform a factory reset procedure.
By default, the Raspberry Pi Compute Module 4 (CM4) tries to boot from internal eMMC before trying to boot from the USB flash drive. Therefore, the Home Assistant OS Installer for Yellow will only get started if the CM4 is empty.
Home Assistant OS 8.5 or newer versions: To clean the boot files from the internal eMMC, press and hold both the red and the blue button at startup. Keep the two buttons pressed for at least 15 seconds. Now, the system should boot from the USB flash drive again.